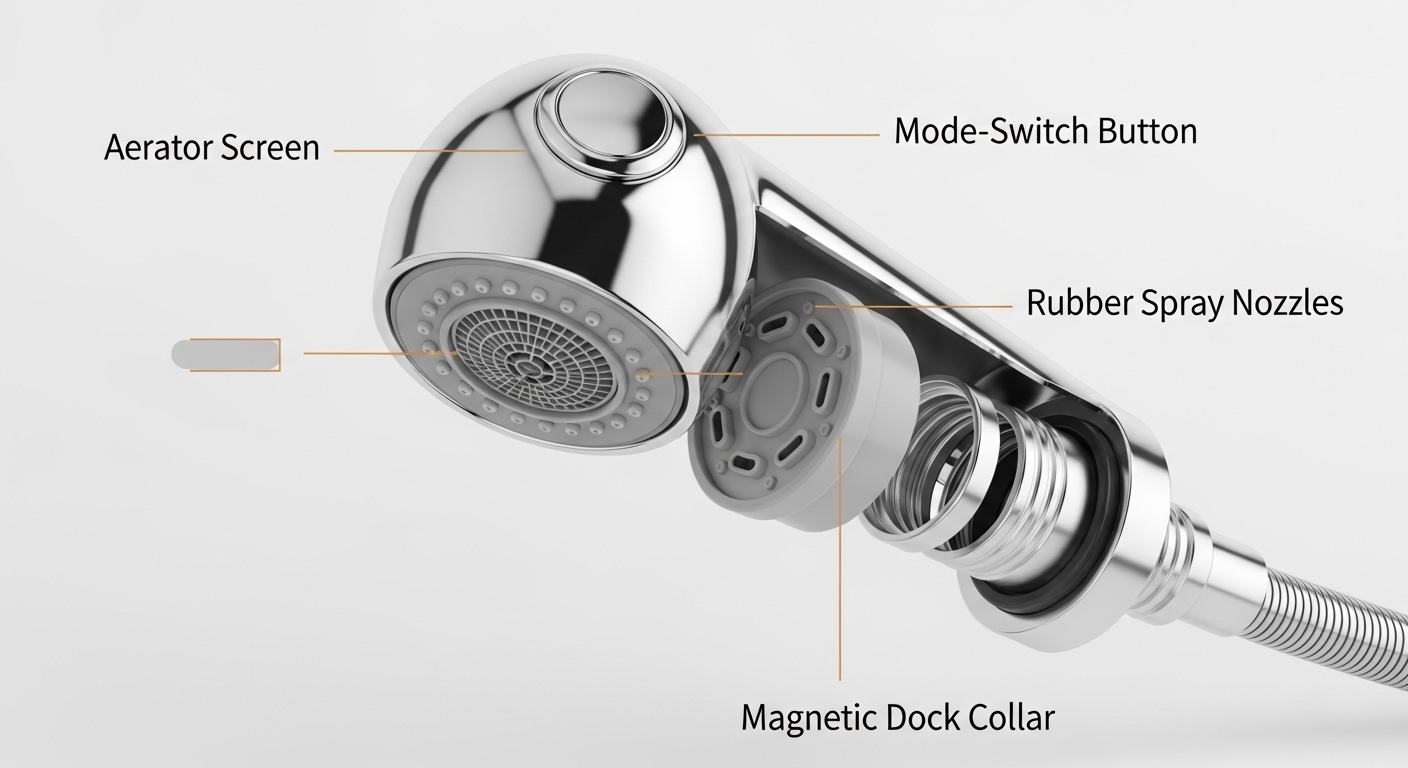
The kitchen faucet spray head is the part of your faucet you actually touch dozens of times a day — the handheld nozzle you pull down to rinse a pot, blast stuck-on rice off a plate, or fill a pitcher in the corner of the sink. Because it takes the most abuse (hard water, soap, being yanked and dropped), it’s also the part that fails first. The good news: on most modern faucets it’s a wear item you can unscrew and swap in about five minutes, no plumber required. Below is exactly how a spray head works, how to know when yours is done, how to pick the right replacement, and how to install it.
What exactly does a kitchen faucet spray head do?
It shapes your water and puts control in your hand. The spray head sits at the end of a flexible hose and does three jobs: it changes the water pattern (typically a soft aerated stream for filling and a concentrated spray for rinsing), it houses a small button or lever to toggle between those modes, and on pull-down models it holds a magnet or ball-catch so the head “docks” cleanly back into the spout.
Inside a good spray head you’ll find an aerator screen (mixes air into the stream so it doesn’t splash), a diverter or mode-switch mechanism, and rubber spray nozzles — those little soft-tipped rings around the face. Those rubber tips aren’t just for looks: they flex so you can rub off mineral buildup with your thumb, which is why premium heads keep spraying straight for years while cheap ones start “peeing sideways” after 18 months.
Pull-down vs. pull-out spray head — what’s the difference?
A pull-down spray head hangs from a tall gooseneck spout and pulls straight down into the sink; a pull-out spray head is a shorter spout where the whole head pulls out toward you horizontally. Pull-down heads are usually a bit larger and heavier and rely on a magnetic dock; pull-out heads are more compact, common in small kitchens, and often dock with a simple weighted hose. It matters when you’re buying a replacement, because the connector and weight differ.
| Feature | Pull-down spray head | Pull-out spray head |
|---|---|---|
| Motion | Pulls straight down into sink | Pulls out horizontally toward you |
| Spout style | Tall gooseneck / high-arc | Low, short spout |
| Docking | Magnetic dock (strong) | Hose weight + gravity |
| Best for | Deep sinks, filling big pots | Low cabinets, windows behind sink |
| Head weight | Heavier | Lighter, more compact |
How do I know if I need to replace the spray head or the whole faucet?
Replace just the spray head if the problem is at the head itself — weak or crooked spray, a mode button that won’t switch, a cracked housing, or dripping from the nozzle after you shut off. Replace the whole faucet only if the leak is coming from the base, the valve/cartridge is shot, or the finish is failing everywhere. In other words, if the water still gets to the head fine and the trouble starts at the nozzle, the head is your fix — and it’s the cheap one.
- Spray is weak or splits into side jets: mineral scale in the aerator or rubber tips. Try cleaning first; if it doesn’t recover, replace the head.
- Button won’t toggle stream/spray, or it’s stuck on both: the internal diverter in the head has failed — a head replacement fixes it.
- Head keeps drooping and won’t dock: usually a weak magnet or a worn dock, sometimes a stretched hose.
- Cracked or leaking where the head meets the hose: a worn gasket or split connector — replace the head and gasket.
- Leak at the faucet base or under the sink: that’s NOT the spray head. If your pull-out kitchen faucet hose is leaking, the fix is the hose or its connections, not the nozzle.
One quick test before you buy anything: unscrew the head, hold it under running water from the hose, and check flow. Strong flow from the hose but weak flow through the head means the head is the culprit. Weak flow from the hose itself points upstream to the cartridge or supply — a completely different repair.
Can I just clean it instead of buying a new one?
Often, yes — especially in hard-water homes, cleaning fixes 60–70% of “weak spray” complaints. Detach the head, soak the face down in a 50/50 white vinegar and water solution for 30–60 minutes, then scrub the rubber nozzles with an old toothbrush and rub the tips with your thumb to pop off scale. Rinse and reattach. If you want the full walk-through, see our guide on cleaning a clogged faucet aerator and our tips on removing hard water stains from a faucet — the same limescale that spots the finish is what’s plugging your nozzles. If the spray is still crooked after a good soak, the diverter or nozzles are physically worn and it’s time for a new head.
How do I choose the right replacement kitchen faucet spray head?
Match three things and you’ll be fine: the hose connector, the dock/weight system, and the shape. Get the connector right and it screws on and seals; get the dock right and it stays put when you’re not using it. Here’s the order to check them.
- Connector thread and type. Most pull-down hoses end in a standard plastic quick-connect or a threaded metal fitting. Unscrew your old head, look at the threads on the hose end, and measure the diameter. Many brands are proprietary — a Moen head won’t seat on a Delta hose. Buying an OEM head for your exact faucet model is the safest match.
- Magnetic vs. non-magnetic dock. If your spout has a strong magnet that “clicks” the head home, buy a magnetic-compatible head with the matching steel collar. A non-magnetic head will droop out of a magnetic spout.
- Spray patterns you actually want. Basic heads give stream + spray. Better heads add a “pause” button (stops water at the head so you can move it without splashing) and a boosted “power clean” jet. Pick based on how you cook.
- Finish. Match your faucet — chrome, brushed nickel, matte black, champagne bronze. A mismatched head looks off, so if you can’t get an exact finish match, replacing the head is a good moment to think about the whole faucet.
If the head threads on but the connector still doesn’t fit, you may need an adapter — our guide on which kitchen faucet hose adapter you actually need walks through the common thread sizes so you don’t guess.
| Spray head tier | Typical price | What you get | Best for |
|---|---|---|---|
| Basic replacement | $12–$20 | Stream + spray, plastic body | Budget fix, rental units |
| Mid-range OEM | $20–$40 | Matched finish, better nozzles, pause button | Most home kitchens |
| Premium multi-function | $40–$70 | Metal body, power jet, silicone self-clean nozzles | Heavy cooks, hard water |
Will any spray head fit my faucet, or do I need the same brand?
No, they’re not universal — connector threads and dock systems are brand-specific, so start by buying a head made for your faucet’s brand and model. Universal-fit heads exist and can work, but they gamble on the thread matching and rarely dock as cleanly. The fastest path: find your faucet’s model number (often stamped under the spout or on the original paperwork), search that plus “spray head,” and buy the exact part. If you can’t find the model, take the old head to the store and match the connector, or measure the thread diameter and pitch. When brand and part number line up, you avoid drips at the connection and a head that flops around.
How do you replace a kitchen faucet spray head step by step?
You can do it in about five minutes with no tools on most faucets. The head simply unscrews from the hose. Here’s the whole process.
- Turn off nothing — you don’t need to. The head is downstream of the valve, so as long as the faucet is off, no water will come out. (If you’re nervous, shut the two supply valves under the sink.)
- Pull the head down a foot or so to expose the hose connection.
- Unscrew the old head. Grip the head in one hand and the hose collar in the other and twist counterclockwise. Some hoses have a quick-connect clip you squeeze instead.
- Check the gasket/weight. Remove the old rubber gasket or washer; a fresh one usually comes with the new head. Note where the hose weight sits if there is one.
- Screw on the new head. Seat the new gasket, thread the head on clockwise, and hand-tighten firmly. Don’t overtighten — you’ll crush the gasket.
- Test. Run the water, cycle stream/spray, and check for drips at the connection. Let the head dock and make sure the magnet holds.
If the head won’t stay docked after the swap, the issue is usually the hose weight position or a stretched hose, not the head. And if the whole faucet feels wobbly while you’re down there, that’s a separate mounting problem — see why a kitchen faucet keeps coming loose and how to lock it back down.
How long should a spray head last, and how do I make mine last longer?
A quality spray head lasts 5–10 years; a cheap one can start spraying crooked in under two. The single biggest factor is water hardness — mineral scale is what kills nozzles and clogs aerators. You can double a head’s life with three easy habits.
- Wipe the head dry after big dish sessions so minerals don’t bake onto the nozzles.
- Rub the rubber tips weekly with your thumb — this pops off scale before it hardens and keeps the spray straight.
- Deep-soak in vinegar every few months if you have hard water, exactly like descaling the aerator.
- Don’t let it slam. A head that drops and bangs the sink cracks its housing over time; let the magnet dock guide it home.
If you’re constantly fighting scale, that’s a whole-home water issue worth addressing, but at the faucet level, a self-cleaning silicone-nozzle head plus these habits is the cheapest defense.
Is upgrading the spray head worth it, or should you replace the whole faucet?
If your faucet body and valve are healthy and you like the style, a new spray head is the smartest $20–$40 you can spend — it restores the spray, fixes the mode switch, and feels new again. Upgrade the whole faucet instead when the base leaks, the finish is peeling, the cartridge drips, or you simply want a different look or a taller spout. A dripping spout, for instance, is a cartridge job, not a head job — here’s why a kitchen faucet drips and how to stop it fast. Think of the head as a wear part (like tires) and the faucet as the car: you replace tires several times over the life of the vehicle.
FAQ
Are kitchen faucet spray heads universal?
No. Connector threads and docking magnets vary by brand and model, so a spray head from one manufacturer usually won’t seal or dock properly on another’s hose. Buy a head matched to your faucet’s brand and model number, or take the old head with you to match the thread. Universal heads exist but require the right adapter and often don’t dock as cleanly.
Why is my spray head leaking where it connects to the hose?
The rubber gasket inside the connection has worn out or the head isn’t threaded on straight. Unscrew the head, replace the small gasket or washer (new heads include one), and hand-tighten firmly without overdoing it. If it still drips, your hose connector threads may be damaged and the hose needs attention too.
Why does my kitchen faucet spray head spray sideways or in weird directions?
Mineral scale is blocking some of the rubber nozzles, forcing water out at odd angles. Soak the head face-down in a 50/50 vinegar-water mix for 30–60 minutes, scrub the nozzles, and rub the rubber tips clean. If it still sprays crooked after cleaning, the nozzles are physically worn and the head should be replaced.
Why won’t my spray head stay docked in the spout?
Usually a weak or misaligned magnetic dock, a stretched hose, or a hose weight in the wrong spot. Check that the head has its steel collar seated, reposition the hose weight lower on the hose so gravity helps, and make sure nothing under the sink is snagging the hose. If the magnet itself is dead, a new magnetic-compatible head restores the hold.
How much does a replacement kitchen faucet spray head cost?
Expect $12–$20 for a basic head, $20–$40 for a matched OEM head with better nozzles and a pause button, and $40–$70 for a premium metal, multi-function head. That’s far less than a $150–$400 new faucet, which is why replacing just the head is the go-to fix when the rest of the faucet is fine.
Can I replace a spray head without any tools?
On most pull-down and pull-out faucets, yes — the head unscrews from the hose by hand. You only need pliers or a wrench if scale has seized the threads, and even then wrap the collar in a cloth so you don’t scratch the finish. The whole swap takes about five minutes.
About the author & why trust Cobbe
Author note: This guide was written by Cobbe’s kitchen fixtures team, drawing on hands-on testing of pull-down and pull-out spray heads across hard-water and soft-water homes. We install, stress-test, and descale these parts the same way your kitchen does, day after day.
About Cobbe: Cobbe designs and manufactures kitchen and bathroom faucets and replacement parts, including spray heads, hoses, and cartridges. Our spray heads are built with self-cleaning silicone nozzles and tested against industry flow and durability standards (including low-lead and flow-rate requirements), and our faucets are backed by a manufacturer’s warranty. If you’re shopping for a full replacement, our team can help you match finish, spout height, and connector so the parts fit the first time. Learn more at cobbe.net.