The article is complete. Here’s the publish-ready HTML fragment:
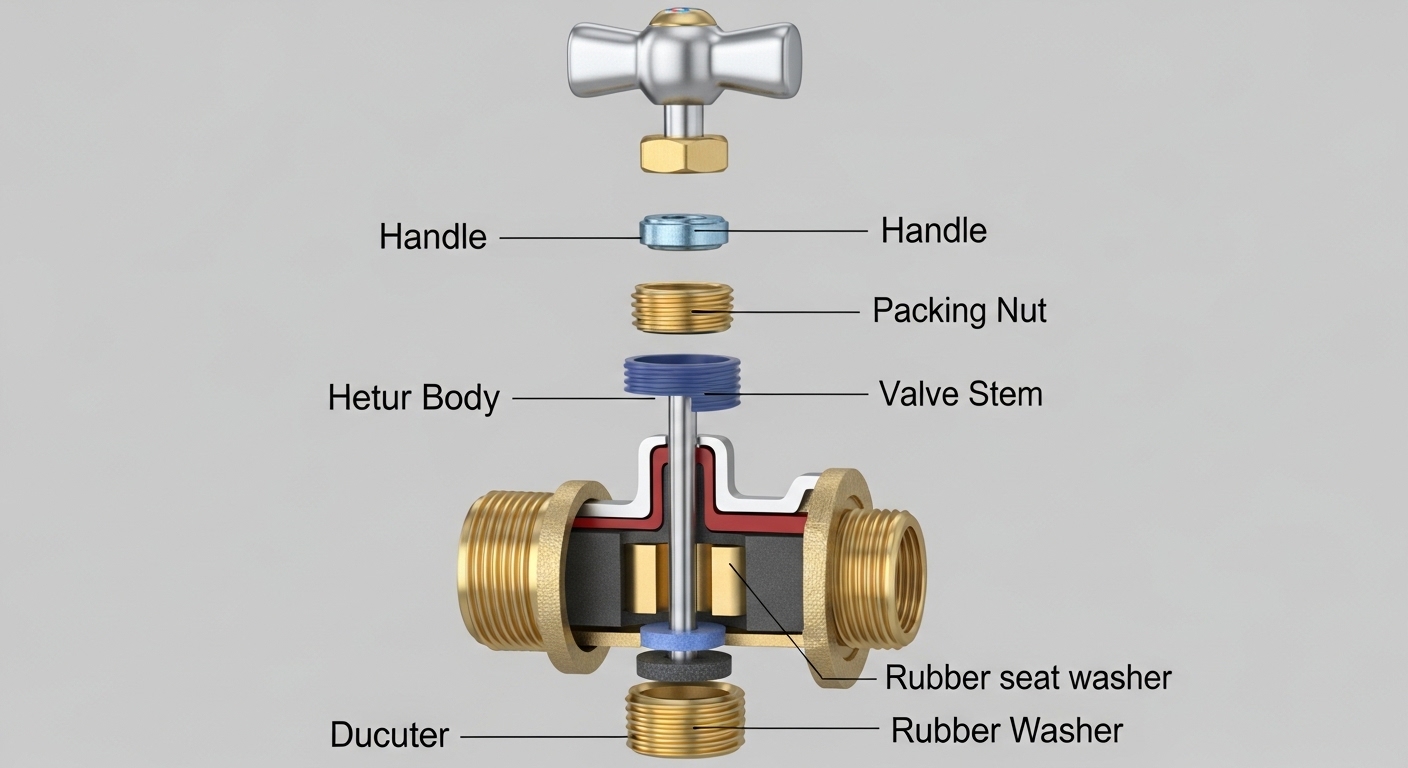
If your faucet won’t fully shut off, drips no matter how hard you crank the handle, or squeaks and grinds when you turn it, a faucet stem replacement is almost always the fix — and it’s one of the most beginner-friendly plumbing repairs there is. The stem is the threaded metal core inside the handle that rises and lowers to open and close the water flow. When its washer, threads, or seals wear out, water leaks past it. Replacing the whole stem (instead of just the washer) gives you a clean, long-lasting fix. Below, I’ll walk you through exactly how to identify your stem, remove it, match a replacement, and get everything back together without flooding the cabinet.
What exactly is a faucet stem, and how do I know mine needs replacing?
A faucet stem is the vertical valve assembly that sits under your handle and controls water flow — as you turn the handle, the stem threads up or down to press a rubber washer against the valve seat, sealing off the water. You most likely need a replacement if you’re seeing any of these signs:
- A drip that won’t stop even after you’ve replaced the seat washer and O-ring.
- A handle that’s hard to turn, grinds, or squeaks — usually stripped or corroded stem threads.
- The handle spins freely without shutting off water — stripped brass threads inside the stem.
- Water leaking around the base of the handle when it’s running — a worn packing or stem O-ring.
- Visible corrosion, cracking, or mineral buildup when you pull the stem out.
Stems live in two-handle “compression” faucets — the classic separate hot and cold design you see on older kitchen sinks, bathroom sinks, laundry tubs, and shower/tub valves. Single-handle faucets don’t use stems; they use a cartridge, and you’ll want to match the correct valve size instead. So the first thing to confirm is that you actually have a stem-style faucet with two handles. If turning a handle clockwise firmly still leaves a drip, the stem’s washer-and-seat seal has failed, and a fresh stem restores it.
Is it better to replace the whole faucet stem or just the washer?
Replace the whole stem when the threads are worn, corroded, or stripped; replace just the washer when the stem itself still looks clean and the only problem is a slow drip. Here’s the honest breakdown: a new rubber seat washer costs about 50 cents and stops most simple drips. But if you’ve already swapped the washer and it still leaks — or the handle feels rough turning — the brass stem threads have worn down and no washer will seal properly. At that point a full stem replacement ($5–$25) is the smarter, longer-lasting move.
Think of it this way: the washer is the consumable, the stem is the mechanism. A washer that keeps failing after a fresh install is telling you the mechanism holding it is worn out. Since you already have the faucet apart to change the washer, upgrading to a new stem only adds a few minutes and saves you from redoing the whole job in six months.
| Situation | Fix It With | Typical Cost | Time |
|---|---|---|---|
| Slow drip, stem threads look clean | New seat washer + O-ring | $1–$3 | 15 min |
| Drip persists after new washer | Full stem replacement | $5–$25 | 30 min |
| Handle hard to turn or grinds | Full stem replacement | $5–$25 | 30 min |
| Handle spins, won’t shut off water | Full stem replacement (stripped threads) | $5–$25 | 30 min |
| Pitted/damaged valve seat too | Stem + reseat or seat replacement | $10–$30 | 45 min |
How do you replace a faucet stem step by step?
Shut off the water, remove the handle, unscrew the packing nut, unthread the old stem, match a new one, and reverse the steps to reinstall — that’s the whole job in one sentence. Here’s the detailed walkthrough:
- Shut off the water supply. Turn the shutoff valves under the sink clockwise until they stop. No under-sink valves? Shut off the main. Then open the faucet to release pressure and drain the line.
- Plug the drain. Drop in a stopper or a rag so no small screws disappear down it.
- Remove the handle. Pry off the decorative index cap (the hot/cold button) with a flat screwdriver, then remove the handle screw underneath. Lift the handle straight up. If it’s stuck from corrosion, wiggle gently or use a handle puller.
- Unscrew the packing nut / bonnet nut. Use an adjustable wrench or deep socket. Turn counterclockwise. Hold the faucet body steady so you don’t twist the whole fixture.
- Remove the stem. Some stems unthread by turning them the same direction you’d turn the handle to open the water; others pull straight out. Note exactly how it comes out.
- Inspect the valve seat. Shine a light down into the faucet body. If the brass seat is pitted or rough, replace it with a seat wrench or resurface it — otherwise a new stem will still drip.
- Match the new stem. This is the make-or-break step (see the next section).
- Install the new stem. Coat the threads and O-rings with plumber’s grease, thread it in by hand first to avoid cross-threading, then snug the packing nut. Don’t over-tighten — snug plus a quarter turn.
- Reassemble and test. Reattach the handle and index cap, turn the water back on slowly, and check for drips at the spout and around the handle base.
One tip from experience: line up your old parts on a towel in the exact order they came off. Reassembly becomes obvious when you just work backward through the row. If you run into a stuck handle before you even reach the stem, our guide on handle problems and how to fix them fast covers the removal tricks in more detail.
How do I match the right replacement faucet stem?
The safest way to match a faucet stem is to physically bring the old one to the hardware store and compare it side by side, or look up your faucet’s brand and model number and buy the exact OEM stem. Faucet stems are not universal — length, thread count, broach (the splined top that grips the handle), and diameter all vary between brands and even between models from the same brand. A stem that’s a hair too long or has the wrong broach simply won’t work.
Here’s how to get the match right:
- Bring the physical stem. Hardware stores keep stem display boards — you line yours up against the samples until the length, threads, and broach match exactly.
- Know your brand. Common stem-style brands include older Delta, Price Pfister, Central Brass, Gerber, and generic imports. Each has its own stem catalog.
- Count the splines. The broach at the top might have 20, 22, 24 splines, etc. — the handle only fits the correct count.
- Measure length and diameter. Use calipers or a ruler; even 1/8 inch off matters.
- Note hot vs. cold. Hot and cold stems are often threaded in opposite directions (right-hand vs. left-hand) — don’t mix them up.
If you’re standing at the counter unsure, our overview on figuring out faucet valve and cartridge sizing explains how to read those measurements so you buy the right internals the first time. And if the faucet itself is 20+ years old with discontinued parts, that’s often the moment people decide to install a whole new faucet instead — sometimes a $60 fixture beats hunting for a $15 obsolete stem.
Why does my faucet still drip after I replaced the stem?
If your faucet drips even after a new stem, the culprit is almost always a damaged valve seat, a wrong-size stem, or a washer that isn’t seating flat. A fresh stem can only seal against a smooth valve seat — if the brass seat inside the faucet body is pitted, scratched, or crusted with minerals, water sneaks past no matter how new the stem is.
Run through this checklist:
- Inspect the valve seat. Feel it with a fingertip (water off). Rough or pitted? Reseat it with a seat wrench or use a seat-grinding tool to resurface it.
- Confirm the stem match. A slightly wrong stem length keeps the washer from pressing fully onto the seat.
- Check the washer. Make sure it’s the right diameter, seated flat, and the retaining screw is snug (but not crushing the rubber).
- Look at the O-rings. If water leaks around the handle base rather than the spout, replace the stem O-ring or packing.
- Don’t over-tighten. Cranking the handle to stop a drip actually chews up the new washer — if it takes force, the seat is the problem, not the pressure.
Persistent drips waste more water than people realize — a faucet leaking one drip per second wastes roughly 3,000 gallons a year. If you’ve chased the drip through washer, stem, and seat and it won’t quit, the faucet body itself may be worn out. For a broader troubleshooting path, see our full guide on why a faucet drips and how to stop it fast.
What tools and parts do I need for a faucet stem replacement?
You need an adjustable wrench, a screwdriver, plumber’s grease, and the correct replacement stem — plus optionally a handle puller and seat wrench. It’s a short list, and most of it is already in a basic toolbox. Here’s the full kit:
| Item | What It’s For | Must-Have or Optional? |
|---|---|---|
| Adjustable wrench or deep socket | Loosening the packing/bonnet nut | Must-have |
| Flat + Phillips screwdrivers | Index cap and handle screw | Must-have |
| Replacement stem (matched) | The new valve core | Must-have |
| Plumber’s/silicone grease | Lubricating threads and O-rings | Must-have |
| Handle puller | Freeing a corroded, stuck handle | Optional |
| Seat wrench / seat grinder | Replacing or resurfacing the valve seat | Optional |
| White vinegar + rag | Dissolving mineral buildup | Optional |
If your faucet is caked in hard-water scale that’s making everything stiff, soak the parts in white vinegar before reassembly — the same trick we cover in our guide on cleaning hard water stains from a faucet. Clean threads go back together far more smoothly, and the grease seals better against fresh metal.
Should I just replace the whole faucet instead?
Replace the whole faucet instead of the stem when the fixture is badly corroded, the parts are discontinued, or you’ve already fixed it multiple times — otherwise, a stem swap is the cheaper, faster win. A stem replacement makes sense for a solid faucet with one worn valve. But if the body is cracked, the finish is flaking, or you can’t source a matching stem for a 25-year-old fixture, throwing $15 at it is money down the drain.
A quick decision rule I give people: if the faucet is under ~10 years old, from a brand still making parts, and otherwise solid — fix the stem. If it’s ancient, leaking from multiple spots, or you already dislike it, a new faucet gives you a fresh warranty, modern ceramic-disc internals that outlast old rubber-washer stems, and no more parts-hunting. Ceramic cartridge faucets, for instance, rarely need the kind of stem service that compression faucets demand.
FAQ
How long does a faucet stem replacement take?
For a typical two-handle faucet, budget 20–40 minutes if you already have the matching stem in hand. First-timers or corroded, stuck handles can push it toward an hour. The actual mechanical work is quick — most of the time goes into matching the right stem and freeing stubborn parts.
Are faucet stems universal or interchangeable between brands?
No. Stems vary in length, thread pitch, diameter, and broach (spline count), so a Delta stem won’t fit a Price Pfister, and even two models from the same brand can differ. Always match your old stem physically or by exact model number before buying.
Do I need to turn off the water for a stem replacement?
Yes, always. Shut the under-sink shutoff valves (or the main if there are none), then open the faucet to relieve pressure and drain the line before you remove anything. Skipping this step turns a simple repair into a flooded cabinet the moment you loosen the packing nut.
Can a worn faucet stem cause low water pressure?
It can. A corroded stem or one clogged with mineral buildup restricts flow, and debris knocked loose during the repair can lodge in the aerator. If pressure is still weak after a new stem, clean the aerator — our guide on cleaning a clogged faucet aerator walks through it in a few minutes.
Why is my faucet handle hard to turn even after replacing the stem?
Usually it’s a lack of lubrication or a slightly mismatched stem. Coat the threads and O-rings with plumber’s grease before installing, and confirm the stem is the correct model. If it’s still stiff, an O-ring that’s too thick or a packing nut over-tightened against the stem can bind it — back the nut off slightly.
How much does a plumber charge to replace a faucet stem versus doing it myself?
A plumber typically charges $100–$250 for a stem or washer job once you factor in the service call and labor, while doing it yourself costs just the $5–$25 in parts. Since it’s a low-risk, no-solder repair, it’s one of the best plumbing tasks to try yourself first.
A note on doing this repair right
Written by the Cobbe fixtures team — we design, test, and sell faucets and bathroom fixtures at cobbe.net, and we handle stem and cartridge repair questions from customers every week. Every Cobbe faucet is pressure-tested and cycle-tested to standards aligned with ASME A112.18.1 / NSF 61 before it ships, and our valves carry a limited lifetime warranty against drips and leaks. That testing background is exactly why we push people toward the right-matched part rather than a “close enough” stem — the seal only works when the geometry is exact. If you’re weighing a repair against an upgrade, our comparison of two of the biggest faucet brands can help you decide what to buy next. When in doubt on a stubborn or antique fixture, it’s always fine to call a licensed plumber — but for most two-handle drips, a stem swap is a confident afternoon win.
Pingback: How Do You Do a Kitchen Faucet Sprayer Head Replacement Without Replacing the Whole Faucet? - Cobbe