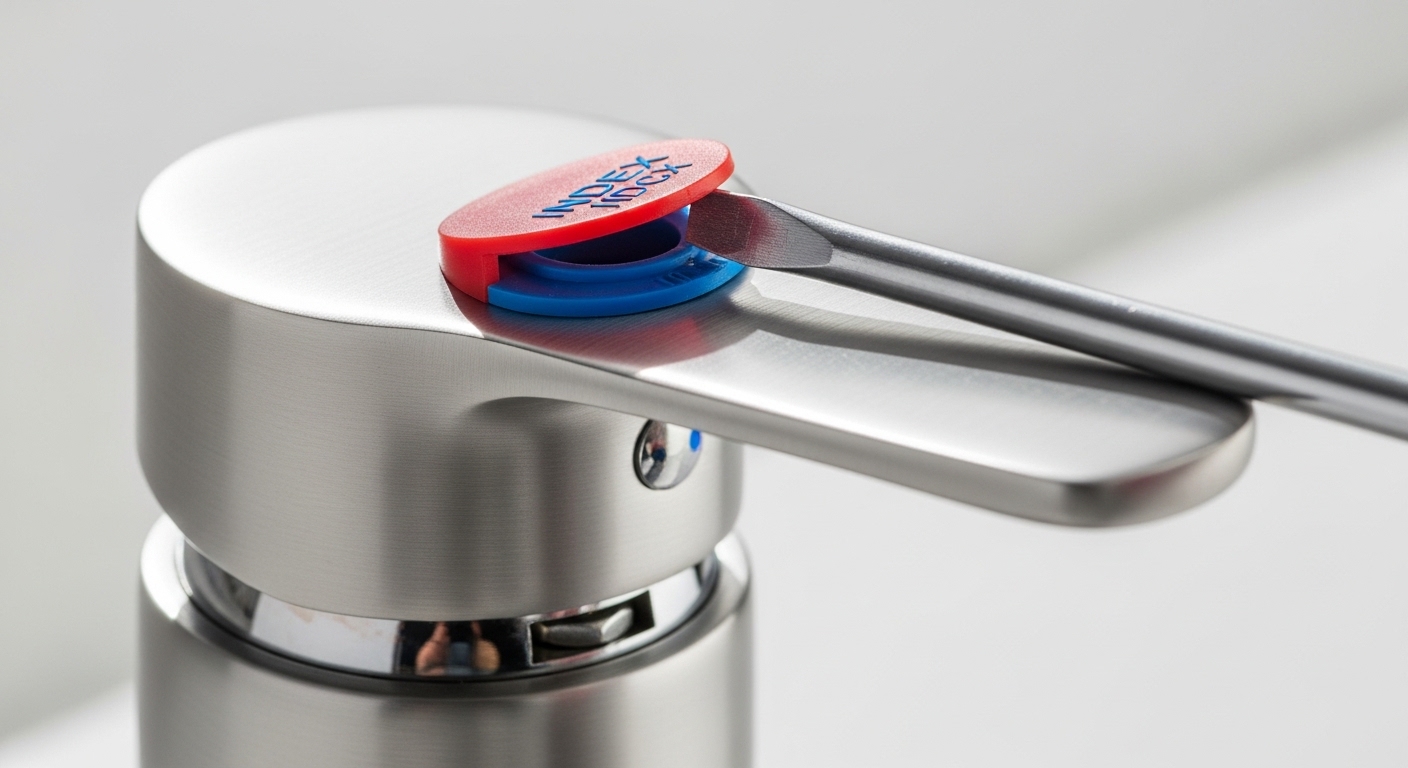
If your sink faucet handle is loose with no screws in sight, you’re not missing anything — the screw is just hidden by design. Modern single-lever and lever-style faucets almost never show their fasteners, because an exposed screw looks cheap and collects grime. Manufacturers hide the set screw under a colored index cap (the little red/blue button), under a snap-on trim ring, or tuck a hex grub screw into the underside or back of the handle where you’d never notice it. So the fix isn’t buying a new faucet — it’s finding where they put the screw. Below I’ll walk you through exactly where each type hides its fastener, how to tighten it correctly, and what to do when tightening doesn’t hold because the part underneath is worn.
Where is the hidden screw on a faucet handle with no visible screws?
The screw is in one of four places: under the decorative cap on top of the handle, in a small hole on the underside or back of the lever, under the base collar ring, or (rarely) it’s a screwless push-on handle that just needs the base nut tightened. Ninety percent of “no screw” faucets are actually the first two.
Here’s how to find yours by feel and sight:
- Look for a plastic button or cap on top. A round red/blue disc (hot/cold indicator) or a plain chrome cap usually pops off with a fingernail or a flathead screwdriver wrapped in tape. Underneath is a Phillips or, more often, a hex (Allen) set screw.
- Run your finger along the underside and back of the lever. Many single-handle faucets — Moen, Delta, Pfister, and Cobbe lever models included — put a tiny hex grub screw in a recessed hole beneath or behind the handle, angled so you can’t see it from the front.
- Check the base collar. On some cross-handle and lever faucets there’s no handle screw at all; the whole handle sits on a threaded collar that’s simply worked loose. You tighten the collar, not a screw.
- Feel for a seam. If the handle has a decorative skirt or trim ring, it may unscrew or snap off to expose the fastener.
The single most common size you’ll need is a 2.5 mm or 3 mm hex (Allen) key, followed by 7/64″ or 1/8″ imperial. A cheap set of metric and SAE Allen keys costs a few dollars and will fit virtually every hidden faucet set screw made in the last 20 years.
How do I tighten a loose single-handle bathroom faucet with no screws showing?
Pop the decorative cap off the top or find the hex hole on the underside, then turn the set screw clockwise with an Allen key until snug — usually a quarter to half turn is all it takes. Don’t overtighten or you’ll strip the soft brass.
Step by step, for the most common single-lever design:
- Shut off the water at the two valves under the sink. It’s optional for a handle-only fix, but it protects you if you accidentally lift the cartridge.
- Find and remove the cap. Gently pry the index button or top cap off with a flathead wrapped in painter’s tape (protects the finish). If there’s no top cap, look for the hex hole on the underside or back of the lever.
- Insert the Allen key into the set screw and turn clockwise. You’ll feel the handle stop wobbling as it clamps down on the stem or cartridge. Snug is enough — think “firm handshake,” not “gorilla.”
- Test the handle. Move it through hot, cold, and off. If it’s solid, snap the cap back on and you’re done.
- If it’s still loose, the set screw is clamping a worn stem or a stripped handle adapter — skip to the cartridge/adapter section below.
This is genuinely the same core repair whether you’re dealing with a bathroom lav faucet or a kitchen faucet; the only difference is where the manufacturer hid the screw. If you want a deeper walkthrough of the diagnosis side — how to tell a handle problem from a valve problem — our guide on what’s really wrong when a faucet handle feels loose breaks it down by symptom.
What if there’s truly no screw at all — is it a push-fit handle?
Yes, some faucets use a screwless push-on handle that clips onto a splined cartridge stem, and when those go loose it’s almost never the handle — it’s the base nut (bonnet nut) or the cartridge underneath that has loosened. You pull the handle straight up and off (no screw to remove), then tighten the nut below it.
Screwless push-fit handles are common on newer designer faucets and on many wall-mounted and widespread styles. Here’s how to handle one:
- Pull the handle straight up. It should slide off the splined stem with firm, even pressure. Wiggle gently; don’t yank at an angle.
- Look at the nut or dome underneath. There’s usually a chrome bonnet nut or a retaining clip holding the cartridge. If the whole assembly rocks, that nut is loose.
- Tighten the bonnet nut with an adjustable wrench or the specific tool that came with the faucet. Snug it firmly.
- Push the handle back on until it seats with a soft click. It should sit flush and feel solid.
If the handle itself spins freely on the stem after reseating, the splines on the plastic handle adapter are stripped — that’s a cheap part to replace, and I cover it next.
Why does my faucet handle get loose again even after I tighten the screw?
Because the set screw isn’t the real problem — it’s biting into a worn stem, a cracked plastic handle adapter, or a cartridge that’s shifting in its bore. Tightening the screw is treating the symptom. When a handle keeps coming loose within days or weeks, the part underneath needs replacing, not re-tightening.
The three usual culprits, in order of how often I see them:
| What’s worn | Symptom you notice | Fix | Typical cost / time |
|---|---|---|---|
| Plastic handle adapter (broach) | Handle spins or lifts loose again days after tightening; set screw won’t grip | Replace the small plastic adapter that connects handle to cartridge | $3–$12 / 15 min |
| Worn or corroded cartridge/stem | Handle loose AND faucet drips, is stiff, or won’t fully shut off | Replace the cartridge or stem | $10–$40 / 20–40 min |
| Loose bonnet/base nut | Entire handle base rocks side to side, not just the lever | Tighten (or reseat with thread tape) the mounting nut | $0 / 10 min |
The tell is timing. If tightening the set screw holds for months, you were fine — it just backed out from daily use. If it’s loose again within a week or two, stop re-tightening and replace the adapter or cartridge, because you’re slowly stripping the set screw threads every time you crank down on a part that can’t hold. This same “keeps coming back” pattern shows up on kitchen faucets constantly; our piece on why a kitchen faucet keeps coming loose digs into the repeat-offender causes and permanent fixes.
How do I replace a worn handle adapter or cartridge on a screwless faucet?
Shut off the water, remove the handle, unscrew the retaining nut or clip, pull the old cartridge or adapter straight out, match it to a replacement, and reverse the steps. Most people finish in under 40 minutes with an adjustable wrench and needle-nose pliers.
The critical detail is matching the part. Faucet cartridges are not universal — brand and model determine the shape, spline count, and length. Two ways to get the right one:
- Bring the old part to the store or photograph it next to a ruler. The spline pattern on top (where the handle grips) and the overall length are what matter most.
- Find your faucet’s model number — often stamped under the spout, on the escutcheon, or in your original paperwork — and order the exact cartridge kit.
Getting the size right is where most DIY cartridge swaps go sideways, so it’s worth a few minutes up front. Our guide to figuring out the correct kitchen faucet valve size explains how to read the specs and avoid buying the wrong cartridge, and if the whole stem assembly is corroded, our faucet stem replacement walkthrough shows the full removal on older compression-style faucets.
Which tools do I actually need?
Very few. For 95% of loose-handle-no-screw repairs you need only:
- A set of metric + SAE Allen (hex) keys — 2 mm through 4 mm covers almost everything
- A flathead screwdriver (for prying caps) and a Phillips (some set screws are Phillips)
- An adjustable wrench or channel-lock pliers for the bonnet nut
- Painter’s or electrical tape to protect the finish while prying
- A replacement cartridge or handle adapter only if tightening won’t hold
Does a loose handle mean I need a whole new faucet?
Almost never. A loose handle is a $0–$15 repair in the vast majority of cases — a hidden set screw to snug up or a small plastic adapter to swap. You only need a new faucet if the body is cracked, the finish is failing across the whole fixture, or replacement cartridges for your model are discontinued.
Think of it this way: the handle, the set screw, the adapter, and the cartridge are all serviceable parts sitting on top of a solid brass or stainless body that can easily last 15–20 years. Replacing a $6 adapter to save a $150 faucet is the definition of a smart repair. The main reasons to upgrade instead of fix are cosmetic (you want a new finish like matte black or brushed nickel), functional (you want a pull-down sprayer you don’t have now), or availability (a 25-year-old off-brand faucet whose parts no longer exist). If you do decide it’s finally time to replace rather than repair, a well-made fixture with standard, easy-to-source cartridges — like the faucets we build at Cobbe — saves you this exact hassle down the road.
FAQ
How do I get the decorative cap off without scratching it?
Wrap the tip of a flathead screwdriver in painter’s tape or electrical tape, slip it into the small seam or notch at the edge of the cap, and lever gently while rotating around the edge. Most index buttons and caps are friction-fit and pop off with light pressure. Never use a bare metal tool directly against a polished or matte finish, and never pry from a single spot — work around the perimeter so it lifts evenly.
What size Allen key fits a hidden faucet set screw?
Most hidden set screws take a 2.5 mm or 3 mm metric hex key, or a 7/64″ or 1/8″ SAE key on American brands. Buy a small combined metric-and-SAE hex set so you have both; the screw is soft brass, so use the key that fits snugly with no wiggle — a slightly-too-small key will round out the socket and turn an easy job into a drilling job.
Which way do I turn the set screw to tighten it?
Clockwise, following the old “righty-tighty” rule, viewed from the end you’re inserting the key into. A quarter to half turn past first resistance is usually enough. If you turn and turn and it never firms up, the screw is stripped or it’s clamping a worn adapter — stop and replace the part rather than forcing it, because you’ll strip the threads completely.
Why is my faucet handle loose AND dripping at the same time?
That combination points to a worn cartridge, not just a loose handle — the same internal wear that lets the handle wobble also lets water seep past the seals. Tightening the set screw won’t stop the drip. You’ll want to replace the cartridge, which fixes both problems at once. If the drip is your bigger concern, our guide on why a faucet drips and how to stop it fast walks through the cartridge diagnosis.
Can I fix a loose faucet handle without turning off the water?
For a handle-only fix — just tightening a hidden set screw — yes, you can leave the water on, because you’re not opening the valve. But the moment you plan to pull the handle off, remove the bonnet nut, or swap a cartridge, shut off both supply valves under the sink first. It costs you 30 seconds and prevents a face-full of pressurized water if the cartridge lifts out unexpectedly.
My handle has no cap and no screw hole anywhere — now what?
It’s a screwless push-fit handle. Pull it straight up and off the splined stem (firm, even pressure, no twisting), and you’ll expose the bonnet nut or retaining clip underneath. The looseness is almost always that nut backing off, or a stripped plastic handle adapter on the stem. Tighten the nut, or replace the adapter if the handle spins freely — both are quick, inexpensive fixes.
A quick word on doing this right — and when to call a pro
Author note: I’ve installed and serviced hundreds of residential faucets, and “loose handle, no screws” is one of the most common panicked questions I hear — and one of the most satisfying to fix, because the screw is nearly always hiding in plain sight. Start with the cap and the underside of the lever before you assume anything is broken. If you’ve tightened, replaced the adapter, and swapped the cartridge and the handle still won’t hold, the faucet body itself may be cracked at the stem bore, and that’s the one case where replacement genuinely beats repair.
About Cobbe: Cobbe designs and manufactures kitchen and bathroom faucets built around standard, widely-available ceramic-disc cartridges — so simple repairs like this one stay simple for the life of the fixture. Our faucets are pressure- and cycle-tested to industry durability standards and backed by a limited lifetime warranty on the finish and function, because a faucet you can service yourself is a faucet you keep for decades instead of tossing. If your loose handle turns out to be a fixture that’s just worn out, we’d rather sell you the right cartridge than a whole new faucet you don’t need.