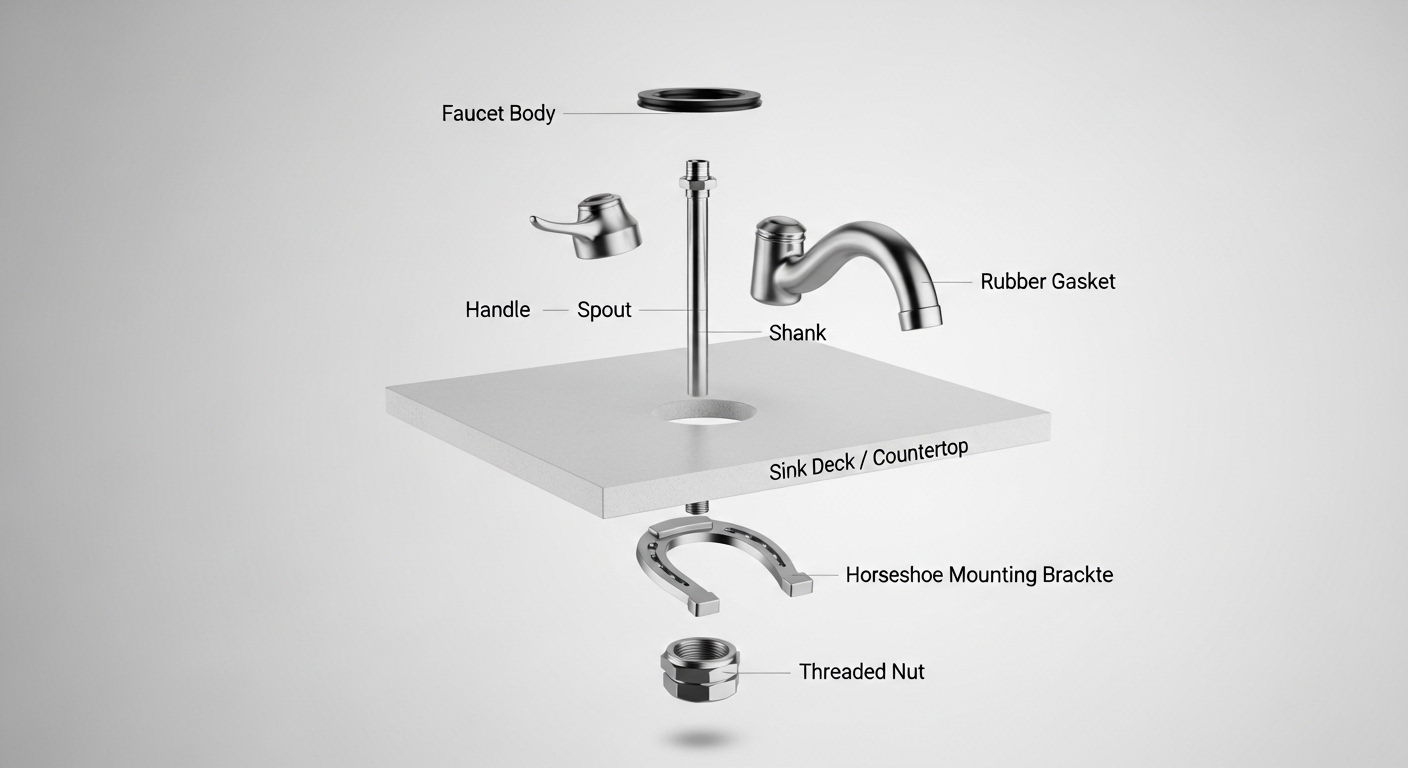
If your faucet rocks side to side, spins when you pull the sprayer, or has started weeping at the base, the culprit is almost always a loose or wrong kitchen faucet mounting bracket. This little bracket does one unglamorous but critical job: it pulls the faucet body tight against the top of the sink deck so nothing moves and nothing leaks. Get it right and your faucet feels rock-solid for a decade; get it wrong and you’ll be back under the sink every few months with a flashlight and a sore neck.
Below, we’ll walk through exactly what the bracket is, the different types, how to know which one you need, and how to install or replace it — in plain English, the way we’d explain it to a friend standing in the aisle.
What exactly does a kitchen faucet mounting bracket do?
A mounting bracket clamps the faucet to your sink or countertop from below so it can’t wobble, spin, or leak. It’s the hidden hardware that turns a loose faucet body sitting in a hole into a fixture that feels like it’s part of the sink.
Here’s the mechanics. Your faucet has a threaded metal tube — the “shank” — that drops through the mounting hole in your sink or counter. On top, a rubber or silicone gasket (and sometimes a decorative base plate or deck plate) seals against water. Underneath, the mounting bracket slides onto the shank and a threaded nut is tightened up against it. As you tighten the nut, the bracket presses upward against the underside of the deck while the faucet body is pulled down against the gasket on top. That clamping “sandwich” is what holds everything firm.
Most brackets are one of a few shapes:
- Horseshoe / U-bracket: An open-ended plate you slide sideways onto the shank — common because you don’t have to remove the water lines to fit it.
- Round washer plate + hex nut: A full ring that drops over the shank before the supply lines are connected.
- Wing-nut / thumb-screw brackets: Two small screws you finger-tighten, then snug with a driver — popular on tool-free “quick install” faucets.
- Threaded mounting nut only: On some slim single-hole faucets the “bracket” is essentially just a heavy brass nut and pressure washer.
All of them do the same job. The differences are about how easy they are to reach and tighten in the cramped cabinet under your sink.
How do I know which mounting bracket my faucet needs?
Match three things: the shank diameter, your deck thickness, and the faucet’s hole configuration. If those three line up, the bracket will work — brand name matters far less than fit.
Run through this quick checklist before you buy anything:
- Shank diameter. Most residential kitchen faucets use a 1/2″ (roughly 13 mm) threaded shank, but pull-down faucets with thick hoses sometimes use a larger 1-1/4″ or 1-3/8″ mounting shank. Measure the tube the bracket rides on.
- Deck (counter) thickness. Standard brackets handle a deck up to about 1.5″–2.25″. A thick stone or double-layer butcher-block counter may need a longer stud or an extension.
- Hole configuration. Single-hole faucets use one central bracket. Three-hole (8″ spread or centerset) faucets often have a bracket on the center body plus separate nuts on the outer shanks.
- Thread pitch. The nut must match the shank threads. This is why the factory bracket is safest — the thread pitch is guaranteed to match.
Our honest advice: whenever you can, use the bracket that came in the box with your faucet, or order the exact replacement part from the manufacturer using the model number. A universal bracket from a hardware bin can absolutely work in a pinch, but a slightly-off thread pitch or an undersized plate is what leads to a faucet that loosens up again in a month. If you’re planning a full swap anyway, our guide on how to install a kitchen faucet step by step walks through where the bracket fits in the whole sequence.
What are the different types of mounting brackets, and which is best for me?
The best type depends on how tight your cabinet is and whether you want a tool-free install. Horseshoe brackets are the easiest to retrofit, wing-nut brackets are the most beginner-friendly, and solid brass nut-style mounts are the most durable for heavy faucets.
Here’s how the common options stack up:
| Bracket type | Best for | Tools needed | Pros | Cons |
|---|---|---|---|---|
| Horseshoe / U-bracket | Retrofits where supply lines are already connected | Basin wrench or pliers | Slides on sideways; no need to disconnect hoses | Can slip if not fully seated |
| Wing-nut / thumb-screw | DIY beginners, tight cabinets | Hand-tight + screwdriver | Tool-free start; even clamping pressure | Plastic versions can crack if overtightened |
| Round plate + hex nut | New installs, heavy pull-down faucets | Basin wrench or socket | Very secure, full 360° contact | Must thread on before hoses are attached |
| Solid brass mounting nut | Premium single-hole faucets | Basin wrench | Extremely durable, won’t strip | Harder to reach in deep cabinets |
| Quick-connect / expanding anchor | Tool-averse homeowners | None or minimal | Fast, top-mount tightening on some models | Limited to specific faucet brands |
For most people replacing a faucet at home, a horseshoe or wing-nut bracket is the sweet spot: you can get it on and tightened without being a contortionist. If you’ve got a heavy commercial-style pull-down faucet with a big counterweight, lean toward a solid metal plate-and-nut for the extra grip. At Cobbe, our pull-down kitchen faucets ship with a reinforced wing-nut style bracket specifically because it gives even pressure and forgives the awkward angles most under-sink cabinets force on you.
Why does my kitchen faucet keep coming loose or wobbling?
A faucet that keeps loosening almost always means the mounting bracket was never fully tightened, the wrong bracket was used, or the gasket underneath has compressed over time. Nine times out of ten, re-seating and re-tightening the bracket fixes it in ten minutes.
The most common reasons a faucet works itself loose:
- The nut was only hand-snug. Under sink, it’s tempting to stop tightening once it “feels tight.” It needs a basin wrench turn or two more.
- The bracket isn’t sitting flat. A horseshoe bracket that’s cocked at an angle only grips on one edge and slowly walks loose.
- Wrong bracket / thread mismatch. A near-fit thread will grab at first, then strip or back off.
- Compressed or missing gasket. If the top gasket has flattened, the whole stack loses tension and the faucet starts to rock.
- Vibration from a pull-down hose. Every time the spray head docks, it tugs the faucet. Over months that micro-movement loosens an underspec’d bracket.
If you tighten the bracket and the faucet is solid but you’re now noticing water at the base, that’s a gasket or connection issue, not a bracket issue — and it’s worth reading why a faucet leaks and drips in our breakdown of why a kitchen faucet drips and how to stop it fast before you tear anything apart.
How do I install or replace a kitchen faucet mounting bracket step by step?
Replacing a mounting bracket takes about 15–20 minutes and needs only a basin wrench, a bucket, and a flashlight. Shut off the water, loosen the old nut, slide on the new bracket, and re-tighten until the faucet won’t budge.
Here’s the full sequence:
- Shut off the water. Close both supply valves under the sink and open the faucet to relieve pressure. Put a small bucket underneath.
- Clear the cabinet. Empty everything out so you can lie on your back and actually see the underside of the faucet.
- Disconnect if needed. For a round plate bracket you’ll disconnect the supply lines; for a horseshoe bracket you can often skip this and slide it off sideways.
- Loosen the old nut. Use a basin wrench to back off the mounting nut, then remove the old bracket.
- Check the gasket. While you’re in there, inspect the top gasket. If it’s flattened or cracked, replace it now — it’s a two-minute job that saves a future leak.
- Fit the new bracket. Slide the new bracket up the shank, keep it flat against the deck, and thread the nut on by hand first to avoid cross-threading.
- Tighten firmly. Snug it with the basin wrench until the faucet body won’t rotate or rock. Don’t go gorilla-tight on plastic brackets — firm is enough.
- Restore water and test. Open the valves, run hot and cold, and wiggle the faucet. Solid and dry means you’re done.
A basin wrench really is the hero tool here — its long handle and swiveling jaw are built for reaching the nut behind the sink bowl where a regular wrench can’t fit. If your faucet also has a separate handle or a locking key mechanism, our explainer on the kitchen faucet key and whether you actually need one clears up what that extra little tool does. And if you’re re-plumbing the sprayer while you’re under there, double-check you’ve got the right connection with our guide to the kitchen faucet hose adapter you actually need.
Can I use a universal or generic mounting bracket instead of the brand-specific one?
Yes, a universal bracket will work as long as the shank diameter and thread pitch match your faucet — but the factory bracket is always the safer bet. Universal brackets are a great emergency fix; they’re a worse choice for a brand-new premium faucet you want solid for ten years.
Universal brackets exist because most 1/2″ faucet shanks share a common thread standard, so a generic horseshoe plate genuinely fits a huge range of faucets. Where people get burned is thread pitch (the spacing of the threads) and plate thickness. A too-thin stamped plate can flex and let a heavy faucet rock; a slightly-off thread pitch will feel tight for a week and then strip. If you go universal, take your old bracket and, ideally, your faucet’s model number to the store and match them physically.
Our take: for a $30 bar faucet, a universal bracket is totally fine. For the main pull-down faucet you use fifty times a day, spend the extra few dollars and order the correct part. It’s the cheapest insurance in your kitchen.
What materials are mounting brackets made from, and does it matter?
Brackets come in reinforced plastic (nylon/ABS), zinc alloy, stainless steel, and solid brass — and yes, the material matters for durability, especially on heavy faucets in humid cabinets. Brass and stainless resist corrosion best; quality reinforced plastic is fine for lighter faucets and won’t rust at all.
Quick rundown of what you’ll encounter:
- Reinforced plastic (nylon/ABS): Rustproof, lightweight, common on modern tool-free brackets. Good for standard faucets; just don’t overtighten.
- Zinc alloy: Inexpensive and strong, but can corrode over years in a wet cabinet if the coating fails.
- Stainless steel: Excellent corrosion resistance and strength; a great all-rounder.
- Solid brass: The gold standard for heavy premium faucets — won’t strip, won’t rust, lasts the life of the faucet.
Cobbe brackets and mounting hardware are made from corrosion-resistant materials and are pressure- and durability-tested to the same standards as our faucet bodies, which are built to meet cUPC/NSF requirements for North American plumbing. That testing matters most for the parts you never see — the ones quietly holding everything together under the sink.
How much should a kitchen faucet mounting bracket cost?
A replacement mounting bracket typically costs between $5 and $20, and most faucets already include one in the box. If you’re buying a standalone bracket, you’re really paying for material quality and correct fit, not a fancy brand name.
Ballpark pricing: a basic plastic or zinc universal bracket runs about $5–$10, a stainless or solid-brass replacement is roughly $12–$20, and a full manufacturer mounting kit (bracket, nut, gaskets, and studs) is usually $10–$25. If a “bracket” is being sold to you for $40+, you’re likely buying a complete mounting kit or paying a big brand premium. For context on how brand pricing plays out across the market, our Moen vs Delta comparison shows how similar hardware can carry very different price tags.
FAQ
Are kitchen faucet mounting brackets universal?
Mostly, but not entirely. Most residential faucets use a 1/2″ shank with a common thread standard, so many brackets are interchangeable. The exceptions are large-shank pull-down faucets and brands with proprietary quick-connect systems. Always match shank diameter and thread pitch before assuming a bracket is universal.
What tool do I need to tighten a faucet mounting bracket?
A basin wrench is the ideal tool because its long shaft and pivoting jaw reach the nut in the tight space behind the sink bowl. For wing-nut style brackets you can start by hand and finish with a screwdriver or pliers. A standard wrench usually can’t fit the angle.
How tight should the mounting bracket nut be?
Tighten until the faucet body won’t rotate or rock when you wiggle it — firm, but not with all your strength. Metal nuts can take a good hard snug; plastic wing-nuts only need firm hand-plus-a-turn pressure, since overtightening can crack the plastic or crush the gasket.
Why is my new faucet still wobbling after I tightened the bracket?
Usually the bracket isn’t sitting flat against the underside of the deck, or the top gasket wasn’t seated correctly, so the clamping pressure is uneven. Loosen the nut, make sure the bracket is square and the gasket is centered, then re-tighten evenly. If the shank hole in the counter is oversized, add a larger washer to bridge the gap.
Can a loose mounting bracket cause a leak?
Indirectly, yes. A loose bracket lets the faucet rock, which breaks the seal of the top gasket and can let water seep down the shank into the cabinet. Tightening the bracket often stops that base-of-faucet weeping — but if water is coming from the spout or handle, that’s an internal cartridge issue instead.
Do single-hole and three-hole faucets use different brackets?
Yes. A single-hole faucet uses one central mounting bracket on its main shank. A three-hole (centerset or 8″ widespread) faucet typically clamps the center body with a bracket and secures the outer valve bodies with their own nuts. Always use the mounting hardware designed for your faucet’s hole configuration.
The bottom line
A kitchen faucet mounting bracket is small, cheap, and completely invisible once installed — but it’s the single part that decides whether your faucet feels solid for ten years or drives you crazy with wobble and drips. Match the shank size, deck thickness, and hole count; use the factory bracket when you can; tighten it properly with a basin wrench; and check the gasket while you’re under there. Do that, and you’ll likely never think about the bracket again — which is exactly the point.
Author note: This guide was written by the Cobbe fixtures team, drawing on hands-on installation and bench-testing of kitchen faucet mounting hardware. Cobbe designs and manufactures kitchen and bathroom faucets and mounting components tested to North American plumbing standards (cUPC/NSF) and backed by our limited warranty. As always, follow your specific faucet’s installation manual, since mounting hardware varies by model.