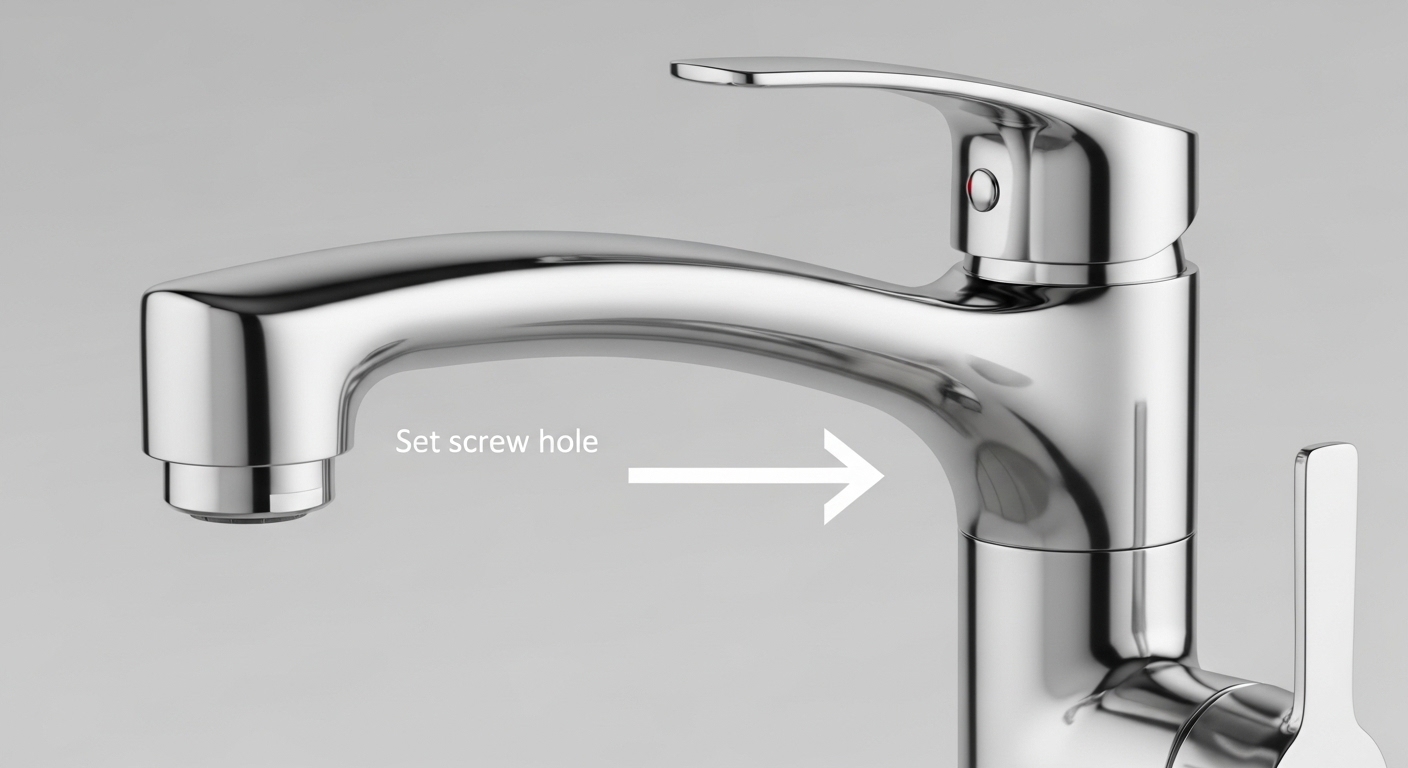
If your American Standard kitchen faucet handle is loose — spinning, tilting, or lifting up off the base — the fix is almost always tightening one small set screw, not replacing the faucet. This is one of the most common (and most over-worried) repairs on a single-handle pull-down kitchen faucet, and you can do it yourself with a hex key you probably already own. Below I’ll walk you through exactly why the handle goes loose, how to tighten it step by step, when a wobble means something more serious (like a worn valve or stripped adapter), and how to make sure it never comes back.
Why does my American Standard kitchen faucet handle get loose in the first place?
It gets loose because the handle isn’t welded on — it’s held to the valve stem by one tiny set screw, and normal daily use slowly vibrates that screw loose. Every time you push the handle up, down, left, and right, you’re putting torque on that single fastener. Over months, thermal cycling (hot water expands metal, cold contracts it) and thousands of on/off motions back the screw out a fraction of a turn at a time until the handle finally wobbles.
On American Standard kitchen faucets, three culprits cause 95% of loose handles:
- A backed-out set screw — the most common cause by far. The little grub screw under the handle simply loosened. A quarter-turn snugs it back up.
- A worn or cracked handle adapter — the plastic or brass insert that couples the metal handle to the round valve stem. If it’s stripped, the screw tightens but the handle still spins because there’s nothing for it to grip.
- A loose valve nut or worn ceramic cartridge — less common, but if the whole valve assembly rocks (not just the handle), the retaining nut under the escutcheon or the cartridge itself has moved.
The good news: the first two are cheap, fast home fixes. This is the same category of problem you’ll see across brands — we cover the universal version in our guide on why there’s a loose handle on your faucet and how to fix it fast, and the bathroom-specific version in why a Kohler bathroom faucet handle goes loose. The mechanism is nearly identical; only the screw size and cap location change.
How do I tighten a loose American Standard kitchen faucet handle step by step?
Tighten it by locating the hidden set screw under the handle, inserting the correct hex key, and turning it clockwise until the handle is snug — no water shutoff required for the basic fix. Here’s the full sequence:
- Find the set screw. On most American Standard single-handle kitchen faucets, look on the underside or back of the handle lever for a small round hole or a decorative cap. If there’s a cap or a small button (sometimes marked red/blue or with the American Standard logo), gently pry it off with a flathead screwdriver or fingernail to expose the screw.
- Grab the right hex key. American Standard kitchen faucet set screws are typically 7/64″ or 3/32″ Allen (hex). Some newer models use a 2.5 mm metric key. Try 7/64″ first; if it’s loose in the socket, drop to 3/32″. Using the wrong size is the #1 way people strip these screws.
- Hold the handle in position and turn clockwise. Push the handle so it sits straight and centered, then turn the hex key clockwise (righty-tighty). You only need it snug — firm, not gorilla-tight. Over-torquing can crack the adapter or strip the screw threads.
- Test the handle. Wiggle it. Run the water hot and cold. If it’s solid and controls flow normally, you’re done — pop the cap back on.
- If it still spins, the set screw is bottoming out on a worn adapter. Move to the next section — you’ll need to replace that small part.
A quick pro tip: put one drop of blue removable threadlocker (Loctite 242) on the set screw threads before you tighten. It stops the vibration-loosening cycle cold, yet still lets you remove the screw later with a hex key. This single step is why plumbers’ repairs “stay fixed” and DIY ones sometimes loosen again in a month.
What if the set screw is tight but the handle still wobbles or spins freely?
If the screw is fully tightened and the handle still turns loosely, the handle adapter (the coupling between handle and valve stem) is worn or stripped — you’ll need to replace that small insert, which costs a few dollars, not a whole faucet. When the set screw grips but the handle spins, it means the screw is clamping onto a rounded-off or cracked adapter that no longer keys to the valve stem.
Here’s how to confirm and fix it:
- Remove the set screw completely and lift the handle straight off the valve stem.
- Inspect the adapter — it’s usually a splined plastic or brass sleeve. Look for stripped ridges, cracks, or a flattened flat-spot where the set screw bit in.
- Note your faucet’s model number (stamped under the spout, on the original box, or in your paperwork) and order the matching American Standard handle adapter / handle kit. American Standard sells these as inexpensive repair parts, and they’re covered under the faucet’s warranty on many models.
- Slide the new adapter onto the valve stem, reseat the handle, and tighten the set screw with threadlocker.
If the entire valve rocks — not just the handle, but the whole stem tilts in the faucet body — the ceramic cartridge or its retaining nut is the issue. That’s still a DIY job but a bigger one, and it often shows up alongside dripping. If your faucet is also leaking, read our fix for a kitchen faucet that’s dripping before you reassemble, since replacing the cartridge solves both problems at once.
What tools and parts do I actually need — and what will it cost?
For the standard loose-handle fix you need almost nothing: a hex key set and five minutes. For a worn adapter or cartridge, add a $3–$25 part. Here’s the honest breakdown so you know what you’re getting into before you start:
| Problem | What you need | Typical cost | Time | Difficulty |
|---|---|---|---|---|
| Set screw backed out | 7/64″ or 3/32″ hex key (+ optional threadlocker) | $0–$8 | 5–10 min | Very easy |
| Stripped handle adapter | Hex key + replacement adapter/handle kit | $3–$15 | 15–20 min | Easy |
| Loose valve retaining nut | Adjustable wrench or basin wrench | $0 | 15 min | Easy |
| Worn ceramic cartridge | Cartridge + Allen key + pliers | $15–$40 | 30–45 min | Moderate |
Notice you never actually need a plumber for a loose handle — a plumber’s call-out alone runs $75–$150, which is wildly more than the part. The only tool worth buying if you don’t own one is a decent SAE hex key set (about $8). If your faucet also uses a mounting/aerator tool, you may want to check whether it needs a kitchen faucet key, which is a different specialty tool for the aerator, not the handle.
Is it safe to keep using my faucet with a loose handle, or should I fix it now?
It’s usually safe for a short while, but fix it soon — a loose handle accelerates wear on the valve stem and adapter, and a wobbling handle can eventually snap the plastic coupling, leaving you unable to turn the water off. What starts as a cosmetic annoyance becomes an actual “I can’t shut off my sink” emergency if you ignore it for months.
The mechanism is simple: every time you operate a loose handle, the metal-on-metal (or metal-on-plastic) play hammers the adapter and rounds it off further. A 5-minute tightening today prevents a 30-minute cartridge replacement later. There’s no water-damage risk from the loose handle itself — it won’t cause a leak — but the underlying wear will keep progressing. Treat it like a loose doorknob: not an emergency, but don’t let it ride for a season.
How do I stop the handle from coming loose again after I fix it?
Stop repeat loosening by using a drop of blue threadlocker on the set screw, tightening to snug (not overtightened), and operating the handle gently rather than slamming it. The vibration that backs the screw out is cumulative, so anything that resists that vibration keeps the handle tight for years instead of months.
Three habits that make the fix permanent:
- Blue Loctite (242), not red. Blue is removable; red is permanent and will make future repairs miserable. One tiny drop on the threads is all you need.
- Snug, not crushing. Set screws are small; over-torque strips them or cracks the adapter. Firm hand pressure on a short hex key is correct.
- Operate the handle, don’t wrench it. Pushing the lever fully and gently — rather than yanking it hard past its stop — dramatically reduces the torque that loosens things over time.
If you’ve retightened the same handle two or three times and it keeps loosening within weeks, that’s your signal the adapter is worn out and no amount of tightening will hold — replace the small part and the problem disappears for good.
American Standard vs. other brands: is a loose handle a design flaw?
No — a loose handle isn’t an American Standard defect; it’s a universal single-handle faucet trait, and American Standard’s set-screw design is actually one of the easier ones to service. Every major brand uses some version of a set-screw-and-adapter handle, so they all loosen eventually. What differs is screw size, cap style, and how cheaply you can get the replacement part.
| Brand | Typical set screw | Handle cap style | Replacement part availability |
|---|---|---|---|
| American Standard | 7/64″ or 3/32″ hex | Snap cap or exposed screw | Excellent, inexpensive |
| Moen | 7/64″ hex | Under-lever screw | Excellent |
| Delta | 3/32″ hex | Button cap (hot/cold) | Excellent |
| Kohler | 2.5 mm / 3/32″ hex | Cap or setscrew collar | Good |
If you’re weighing brands for a future purchase, the loose-handle repair is basically a wash — they’re all serviceable. The bigger decision points are finish durability and valve quality, which we break down in our head-to-head on Moen vs. Delta. The takeaway for right now: a loose American Standard handle is a maintenance item, not a reason to distrust the faucet.
FAQ
What size Allen wrench tightens an American Standard kitchen faucet handle?
Most American Standard kitchen faucet handles use a 7/64″ or 3/32″ hex (Allen) key for the set screw; some newer models use a 2.5 mm metric key. Try 7/64″ first — if it feels loose in the socket, step down to 3/32″. Never force a slightly-too-big key, because that’s the fastest way to strip the screw head.
Where is the set screw on an American Standard kitchen faucet handle?
It’s on the underside or back of the handle lever, usually hidden behind a small snap-on cap or decorative button. Pry the cap off gently with a fingernail or flathead screwdriver to expose the hex socket. On some models the screw is exposed with no cap at all — look for a small round hole where the handle meets the base.
Why does my faucet handle keep coming loose no matter how much I tighten it?
If it loosens again within days or weeks, the handle adapter (the sleeve coupling the handle to the valve stem) is worn or stripped, so the set screw has nothing solid to grip. Replace that inexpensive adapter and add a drop of blue threadlocker to the screw. Continuous re-loosening is the classic symptom of a rounded-off adapter, not an insufficiently tight screw.
Do I need to shut off the water to tighten a loose kitchen faucet handle?
No — tightening the set screw doesn’t open the water system, so you can do it with the supply on. Only shut off the water (using the valves under the sink) if you need to remove the cartridge or valve assembly. For the everyday loose-handle fix, leave the water on and just keep the faucet turned off while you work.
Is a loose American Standard faucet handle covered under warranty?
American Standard kitchen faucets carry a limited lifetime warranty on many models that covers defective parts, and small components like handle adapters and cartridges are typically available as free or low-cost warranty replacements. Keep your model number and proof of purchase handy, and contact American Standard’s support with the part you need. Note that normal set-screw loosening is wear-and-maintenance, not usually a warranty “defect,” but the physical replacement parts are cheap and easy to get.
Can a loose handle cause my faucet to leak or drip?
The loose handle itself won’t cause a leak — but the same wear that loosens the handle often coincides with a worn cartridge, which does cause dripping. If you notice both a wobbly handle and a drip, replace the cartridge and adapter together while you have the handle off, and you’ll solve both issues in one repair.
A note on who wrote this
This guide was written by the Cobbe fixtures team, drawing on hands-on repair experience across American Standard, Moen, Delta, and Kohler single-handle kitchen faucets. Cobbe designs and manufactures kitchen and bathroom faucets built to North American plumbing standards (cUPC-listed valves and lead-free waterways compliant with NSF/ANSI 61 and the U.S. lead-free act), and every fixture we ship is pressure- and cycle-tested before it leaves the line. We back our faucets with a limited lifetime warranty on the finish and function, and we publish these repair guides because a faucet you can fix yourself is a faucet worth owning. Always match replacement parts to your exact model number, and when in doubt, contact the manufacturer’s support line before forcing anything.